Make an Ender chest in your Minecraft world and store all of your valuable items in its storage. It can store your items for traveling long distance locations. Your adventures become easier because you have all the useful item by your side even if your are far from your base.
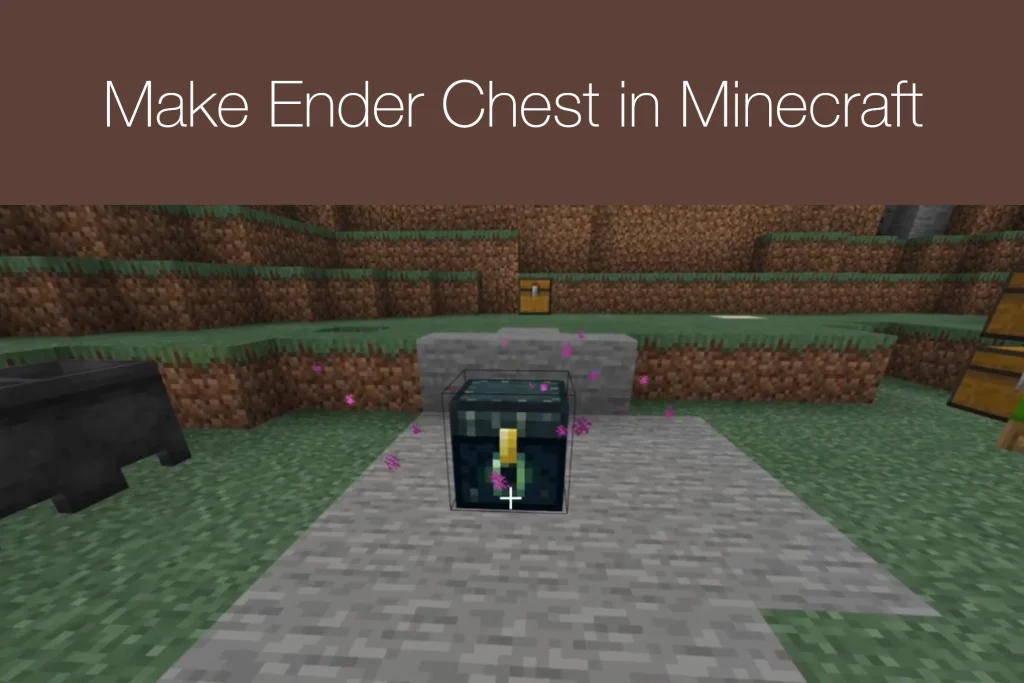
Ultimate Guide on Making an Ender Chest in Minecraft PE
An Ender Chest is one of the most useful storage blocks in Minecraft free, especially when you travel far from your base. Unlike a normal chest, an Ender Chest gives you access to the same stored items from any other Ender Chest in the same world. This makes it a great choice for carrying important tools, armor, food, diamonds, and other valuable items without filling your inventory. Learning how to make an Ender Chest in Minecraft is simple once you have the right materials.
The Ender Chest is especially helpful during long adventures. You can place one near your home, another in a mining area, and another in a Nether base, and they will all connect to the same personal storage. Even though the chests are placed in different locations, the items inside remain linked to your player. This means you can safely store something in one Ender Chest and collect it later from another one. Also checkout How to Make a Redstone Comparator in Minecraft.
Materials Needed to Make an Ender Chest
Before you start crafting, you need two main materials: Obsidian and an Eye of Ender. You will need eight blocks of Obsidian and one Eye of Ender. These materials are not as easy to collect as the ingredients for a regular chest, so it is a good idea to prepare them before opening your crafting table.
Obsidian can be found where water comes into contact with lava. You need a diamond pickaxe or a stronger pickaxe to mine it and collect the block. The Eye of Ender is made by combining an Ender Pearl with Blaze Powder. Ender Pearls can be obtained from Endermen, while Blaze Powder comes from Blaze Rods that you can get from Blazes in Nether Fortresses.
Step 1: Collect Eight Obsidian
The first material you need is Obsidian. You need a total of eight Obsidian blocks for one Ender Chest. You can create Obsidian by allowing water to flow over a lava source block. Once the lava turns into Obsidian, use a diamond pickaxe or Netherite pickaxe to mine it. A weaker pickaxe will not give you the Obsidian block. Continue mining until you have eight pieces. You can collect more if you want to make several Ender Chests later.
Step 2: Get an Ender Pearl
Next, you need an Ender Pearl. Endermen are the main source of Ender Pearls in Survival mode. Endermen usually appear in dark areas and can also be found in places such as the Overworld, Nether, and End. When you defeat an Enderman, it may drop an Ender Pearl.
Finding Endermen can sometimes take time, so collect an extra pearl or two if possible. They are also useful for other recipes and for creating Eyes of Ender.
Step 3: Find Blaze Rods
To create an Eye of Ender, you also need Blaze Powder. Blaze Powder is made from Blaze Rods. Blazes can be found in Nether Fortresses. They are flying hostile mobs that attack by throwing fireballs, so take care when fighting them. Defeating a Blaze can give you a Blaze Rod.
You only need one Blaze Rod to make enough Blaze Powder for one Eye of Ender. However, collecting several rods can be useful because Blaze Powder has other important uses in Minecraft.
Step 4: Make Blaze Powder
Once you have a Blaze Rod, open your crafting table or crafting area and place the rod into the crafting grid. A Blaze Rod can be turned into Blaze Powder. You only need one Blaze Powder for the Eye of Ender required for the Ender Chest.

Keep any extra Blaze Rods or Blaze Powder because they can be useful later when making more Eyes of Ender or brewing certain items.
Step 5: Craft an Eye of Ender
Now combine your Ender Pearl with Blaze Powder.Place one Ender Pearl and one Blaze Powder in the crafting area. Their positions do not need to follow a special pattern. When both materials are in the crafting grid, the result will be one Eye of Ender.

Take the Eye of Ender and keep it ready for the final crafting step. Be careful not to use it for another purpose before you have made your Ender Chest.
Step 6: Open the Crafting Table
With eight Obsidian blocks and one Eye of Ender in your inventory, open a crafting table. The Ender Chest uses the full 3-by-3 crafting grid, so you cannot make it using only the small inventory crafting area. Make sure you have enough space in your inventory for the finished block.
Step 7: Place the Obsidian
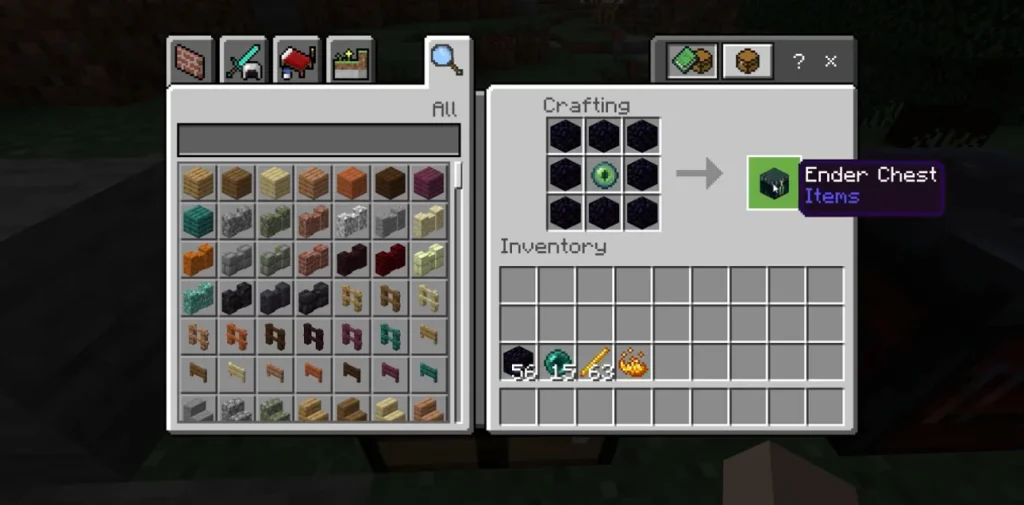
Put the eight Obsidian blocks around the outside of the crafting grid. The top row should contain three Obsidian blocks. Put two Obsidian blocks on the left and right sides of the middle row, leaving the center space empty. Then place three more Obsidian blocks across the bottom row. This creates a frame with an empty space in the middle.
Step 8: Add the Eye of Ender
Place one Eye of Ender in the empty center slot of the crafting grid. Your recipe should now contain eight Obsidian blocks surrounding one Eye of Ender. When the materials are placed correctly, an Ender Chest will appear in the result box. Move the Ender Chest into your inventory to complete the crafting process.
How to Use an Ender Chest
After crafting your Ender Chest, place it wherever you want to use it. You can open it just like a normal chest and put your items inside. The major difference is that its storage is connected to your personal Ender Chest inventory.
For example, imagine that you are mining deep underground and find a large number of diamonds. Instead of carrying all of them while continuing to explore, you can place an Ender Chest and store the diamonds inside. Later, you can return to your base, open another Ender Chest, and access those same diamonds.
Ender Chest storage is personal. Other players cannot normally open your Ender Chest and take the items stored in your personal inventory. This makes it a useful way to protect valuable resources while playing on a multiplayer server.
Ender Chest vs Regular Chest
A regular chest stores items inside that specific block. If you place two normal chests in different locations, they do not share their contents. You must return to the original chest to get the items you stored there.
Ender Chests work differently. Every Ender Chest that you access connects to your own Ender Chest inventory. This gives you a portable storage system that works across large distances.
However, Ender Chests require more difficult materials than regular chests. A normal chest mainly requires wooden planks, while an Ender Chest needs Obsidian and an Eye of Ender. Because of this, many players use regular chests for everyday storage and save Ender Chests for important items and long-distance travel.
Tips for Using an Ender Chest
One useful trick is to keep an Ender Chest in your main base and carry another one when exploring. When you need access to your stored items, place the portable Ender Chest and open it. Afterward, you can break the chest and take it with you again.
Remember that you should use a diamond or Netherite pickaxe with the Silk Touch enchantment if you want to collect an Ender Chest as a block. Without Silk Touch, breaking an Ender Chest does not return the complete chest in the normal way.
You can also use an Ender Chest to keep emergency supplies safe. Store extra food, tools, armor, building blocks, or other important items inside it. If you die while exploring, the items stored in your Ender Chest remain separate from the items you were carrying.